
You have your WordPress site up and running, but does anyone read it?
Let’s add Google Analytics to your site so that you will know how many people view your site, where they are from, what they are interested in, and so on. Then you can use this data to better cater to your audience and draw in new visitors.
Many plugins for WordPress already exist to add Google Analytics to your pages, but these plugins may be bloated with features that you neither want nor need. Making your own simple plugin to accomplish the same task is actually quite easy, and it also serves as an excellent introduction to building your own WordPress plugins.
Tracking Code
First, let’s get the Google Analytics script that needs to be inserted into your website’s pages so that Google can track your visitors.
Log into Google Analytics with your Google account, or create an account if you don’t already have one.
Go to the Admin page. Then, in the Property section, click on Tracking Info.
In the list that expands under Tracking Info, click on Tracking Code.
You should then see your Website tracking code, which looks like this:
<script>
 (function(i,s,o,g,r,a,m){i['GoogleAnalyticsObject']=r;i[r]=i[r]||function(){
 (i[r].q=i[r].q||[]).push(arguments)},i[r].l=1*new Date();a=s.createElement(o),
 m=s.getElementsByTagName(o)[0];a.async=1;a.src=g;m.parentNode.insertBefore(a,m)
 })(window,document,'script','https://www.google-analytics.com/analytics.js','ga');

 ga('create', 'UA-########-#', 'auto');
 ga('send', 'pageview');

</script>
Of course, the Tracking ID “UA-########-#” will have numbers unique to your site.
If you had a simple, one-page site, then you could just paste this script onto that page, and Google would track any visits to it. Of course for a more complicated website, you don’t want to go through all the effort of manually pasting this into each and every page that you have or may create in the future. Therefore, we will build a WordPress plugin that automatically inserts this script throughout your website, so that visits to any page will be tracked.
WordPress Plugin
Plugins allow us to extend WordPress’s functionality without touching the core framework’s code. We can also avoid making direct modifications to the themes that we use to define the style and layout of our website. Other than the ability to mix and match components, this separation of code allows WordPress and themes to be updated without breaking the plugins, and vice versa.
We make plugins for WordPress using PHP code. A plugin needs a header to identify it, functions to add the extra functionality, and hooks to connect it to the WordPress core or themes.
Header
Each plugin has a header comment in its .php file that contains metadata so that WordPress knows it is a plugin and can add it to the list of available plugins.
Let’s create a file named spherux-google-analytics.php for our plugin and add this information in a comment at the start of the file. At least the “Plugin Name” must be specified, but several other fields can also be provided:
<?php
/*
Plugin Name: Spherux Google Analytics
Plugin URI: https://www.spherux.com
Description: Plugin to add Google Analytics script to header.
Version: 1.0
Author: Daniel King
*/
Function
PHP pages, like the ones that your WordPress site is made from, contain static HTML with embedded PHP code between “<?php” and “?>” instructions that lets the server dynamically build the page depending on calls to functions, outputs from database queries, values of variables, and so on. We want to add new content to our pages, so we will need to write a new function that outputs the HTML for the Google Analytics tracking code when it is called.
Let’s create a function named “spherux_google_analytics” and take advantage of the fact that anything not within the php instructions is just added to the page as raw HTML.
Within the curly braces of the function’s definition block, close the current PHP section with “?>” and open a new one with “<?php”.
Then paste the Google Analytics tracking code between the close of the first PHP section and the opening of the second. This in-between portion will not be interpreted as PHP code and will be output as-is to the page whenever the function is called.
We could alternatively use PHP’s echo function, but it is easier to add the HTML inline in this case because it is a large static block of code with no other variables or functions needed.
In the end, our function looks like this:
function spherux_google_analytics() {
?>
 <script>
 (function(i,s,o,g,r,a,m){i['GoogleAnalyticsObject']=r;i[r]=i[r]||function(){
 (i[r].q=i[r].q||[]).push(arguments)},i[r].l=1*new Date();a=s.createElement(o),
 m=s.getElementsByTagName(o)[0];a.async=1;a.src=g;m.parentNode.insertBefore(a,m)
 })(window,document,'script','https://www.google-analytics.com/analytics.js','ga');

 ga('create', 'UA-########-#', 'auto');
 ga('send', 'pageview');
 </script>
<?php
}
Again, “UA-########-#” should be your Tracking ID from before.
Hook
We have written our function containing the Google Analytics script. Now how and when do we call that function?
For the plugin to modify your website, we will need a Hook. A Hook allows a function to be called when an event occurs, like when part of a page is being generated. Technically, there are two types of Hooks, Actions and Filters. Actions allow us to call a function, while Filters allow us to modify data used by existing Actions. For this plugin, we need to create an Action that calls our function that inserts the tracking code.
Google says to insert the script into your site’s <head> section. Technically, you could insert it anywhere that is a part of all your site’s pages, but the <head> section is typically recommended since it is loaded early and can give more accurate tracking data if your pages take some time to load.
To add the script to the <head> section, we need to add an Action that occurs when this section is being built. Conveniently, your WordPress theme template should trigger the wp_head event while it builds this section. This event will be our Hook for executing an Action that calls the spherux_google_analytics function that we wrote before.
We add this Action, using the add_action function:
add_action('wp_head', 'spherux_google_analytics');
The first parameter is the Hook: wp_head. For a list of other available hooks that you could use if you wanted to place the script somewhere else, see the Action Reference.
The second parameter is the function to call: spherux_google_analytics.
With this Action added, the spherux_google_analytics function will be called while the <head> section is being generated, inserting the Google Analytics script between the <head> and </head> tags on the page.
Complete Plugin
Combining the Header, Function, and Hook portions into a single .php file gives us our plugin.
Here is the full plugin file, spherux-google-analytics.php:
<?php
/*
Plugin Name: Spherux Google Analytics
Plugin URI: https://www.spherux.com
Description: Plugin to add Google Analytics script to header.
Version: 1.0
Author: Daniel King
*/

function spherux_google_analytics() {
?>
 <script>
 (function(i,s,o,g,r,a,m){i['GoogleAnalyticsObject']=r;i[r]=i[r]||function(){
 (i[r].q=i[r].q||[]).push(arguments)},i[r].l=1*new Date();a=s.createElement(o),
 m=s.getElementsByTagName(o)[0];a.async=1;a.src=g;m.parentNode.insertBefore(a,m)
 })(window,document,'script','https://www.google-analytics.com/analytics.js','ga');

 ga('create', 'UA-########-#', 'auto');
 ga('send', 'pageview');
 </script>
<?php
}

add_action('wp_head', 'spherux_google_analytics');

?>
Again, remember to replace “UA-########-#” with the Tracking ID provided by Google Analytics.
Plugin Installation
The plugin is complete, and we are ready to install it. While you could just copy the spherux-google-analytics.php file directly to your site’s wp-content/plugins directory, I prefer to package the plugin and upload it through the WordPress Administration Screens – the same way you can install any plugin.
Package the plugin
To upload the plugin, it needs to be packaged in a .zip file with the following command:
zip spherux-google-analytics.zip spherux-google-analytics.php
In this case, the .zip only contains one file, but packaging plugins becomes particularly useful when a plugin has multiple .php files or other resources, such as images or stylesheets.
Add the plugin
Uploading the packaged plugin is made easy by the WordPress Plugins Screen.
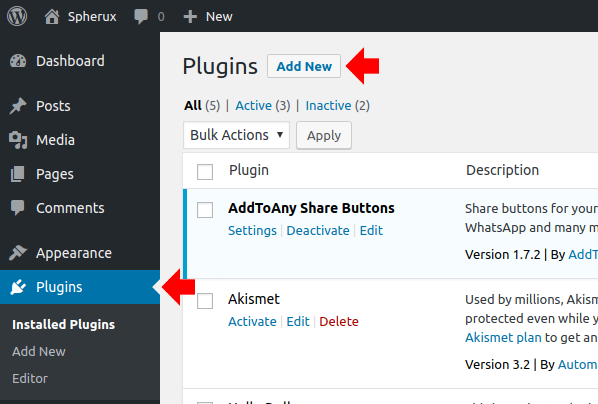
Log into your WordPress Admin Area by visiting http://yoursite.com/wp-admin.
Navigate to the Plugins Screen and click on Add New.
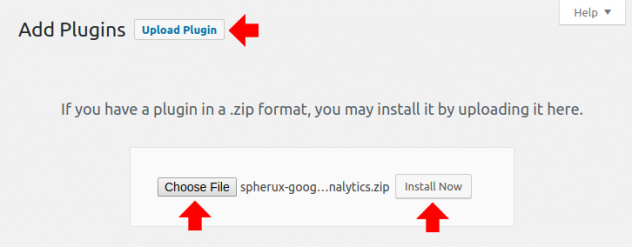
Then click on Upload Plugin, choose the spherux-google-analytics.zip file, and click on Install Now.
Activate the plugin
All that is left to do is to activate the plugin.
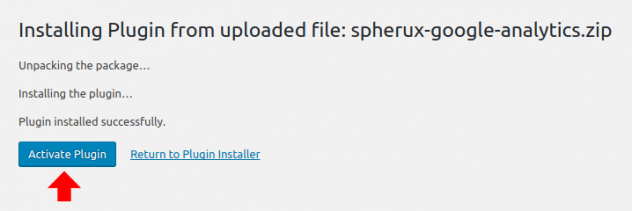
After installing the plugin, you will be given the option to activate it.
Click on Activate Plugin to activate the plugin.
You can also activate and deactivate plugins from the Plugins Screen.
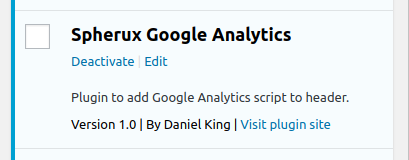
Congratulations, you now have a plugin installed that inserts the Google Analytics tracking script into your website’s pages. Any visits to your website should be tracked and shown within Google Analytics.
Test
Now let’s make sure the plugin actually works.
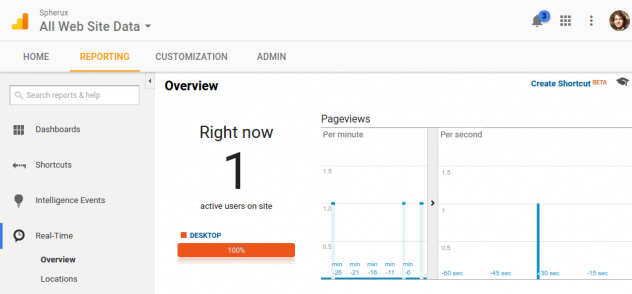
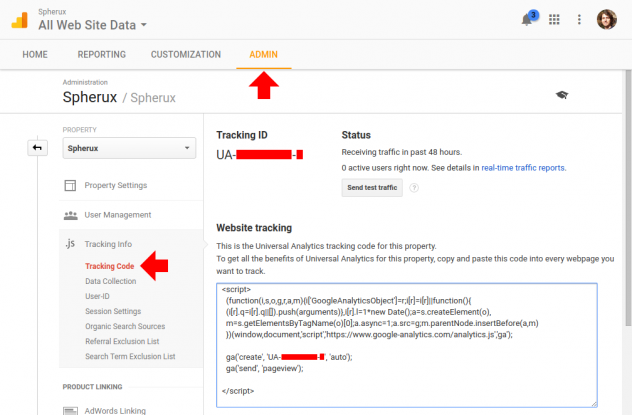
Of course, a quick way to check is to log into Google Analytics and see if it is receiving data. You can go to the Admin > Property > Tracking Info > Tracking Code page, which we originally got the tracking code from, to see if data is being received. It should say under Status, “Receiving traffic in past 48 hours.” You can also click on the real-time traffic reports link below to see real-time changes when you view the site yourself.
We can also check that the tracking code is a part of your website by viewing the page’s source code.
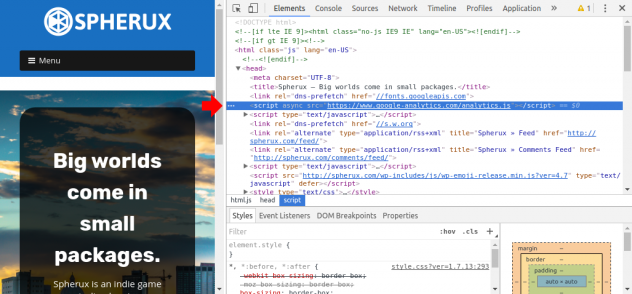
Using Google Chrome, visit your website and right-click on the page.
Choose Inspect.
Now on the right, you will see the page’s source code on the Elements tab.
Look for “<head>…</head>” and expand it.
Somewhere in the <head> section, you should see the Google Analytics script:
<script async="" src="https://www.google-analytics.com/analytics.js"></script>
Also take a look at the Network tab.
Once on the tab, reload your page with the F5 key to collect data.
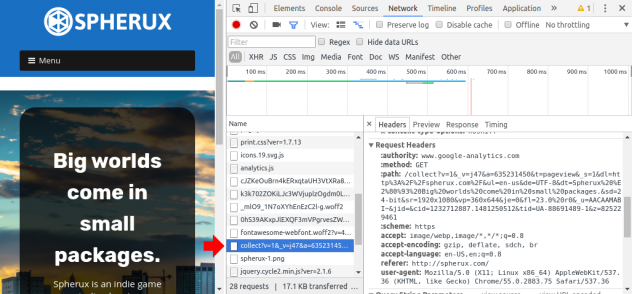
You can now see all the network activity required to load your website.
In the list, you should see “analytics.js”, which is the script we saw in the source code before.
You should also see an item called “collect?v=1&_v=j47&…” which is a request from your browser for an image on Google’s server. This image is really just an empty placeholder, but Google Analytics uses the request to track your visit. The request also sends along a bunch of query string parameters containing browser information such as screen resolution and language.
If you see the tracking code in your page’s source code and this network activity, but don’t see the data showing in Google Analytics, then check that the tracking code in your plugin matches what Google provides.
Otherwise, you should now have Google Analytics tracking successfully enabled on your website. You will now be able to track visits and use that data to improve your site and its content.
References
Analytics for Web (analytics.js) | Google Developers – Google Analytics developer’s guide
Plugin Developer Handbook | WordPress Developer Resources – Detailed guide for writing WordPress plugins
Plugin API | WordPress Codex – Complete WordPress plugin API
PHP Manual | PHP – Documentation for PHP
How to Add Google Analytics to WordPress with a Simple Plugin | WPMU DEV – A similar tutorial that helped inspire this post